

How to Fix Chipped Tile in Hudson Valley, NY: A Complete Repair Guide
Chipped tiles can be repaired without replacement using epoxy fillers, paint touch-ups, or professional resurfacing. Small chips are DIY-friendly, while deep damage near grout lines or structural cracks often require expert assessment. This guide covers material selection, step-by-step repair methods, cost considerations, and when to call a professional in the Hudson Valley region.
You walk across your kitchen floor and notice it: a small chip in your favorite ceramic tile. Maybe it happened during a recent renovation, or perhaps something heavy dropped during dinner prep. Either way, that tiny imperfection now catches your eye every single time you enter the room. The good news? You don’t need to rip up your entire floor or spend thousands on replacements. Most chipped tiles can be repaired effectively with the right approach, tools, and a bit of patience.
Key Takeaways
- Small surface chips (under 1/4 inch) can be fixed with epoxy fillers and matching paint in under an hour
- Deep chips or cracks that extend to the tile edges or grout lines may indicate structural issues requiring professional evaluation
- Color matching is the biggest challenge; bring a tile sample or photo to hardware stores for accurate matching
- Professional repairs typically cost between $150-$400 depending on tile type, location, and damage severity
- Prevention matters: felt pads under furniture, rugs in high-traffic areas, and proper substrate installation reduce future chips
- Older homes in Hudson Valley often have unique tile patterns that make repair more practical than replacement
What Causes Tiles to Chip in the First Place?
Understanding why your tile chipped helps you prevent future damage and choose the right repair method. Tile chips rarely happen randomly. They’re usually the result of impact, installation issues, or material weaknesses that develop over time.
The most common culprit is impact damage. Dropping a cast iron pan, dragging heavy furniture without felt pads, or even pet claws can create surface chips. In Hudson Valley homes, where many properties feature original tile work from the early 1900s, the glazing on older tiles becomes more brittle with age. These vintage tiles chip more easily than modern porcelain, but they’re also often irreplaceable, making repair your best option.
Installation problems account for nearly 30% of tile chipping issues within the first five years. When tiles aren’t properly adhered to the substrate or if the mortar bed has voids, the tile flexes under pressure. This flexing creates stress points that eventually crack or chip, especially along edges and corners where the tile is weakest.
Temperature fluctuations also play a role, particularly in entryways and mudrooms where cold air meets heated floors. The expansion and contraction can weaken the glaze over years of seasonal changes. If you’re dealing with a historic property and considering restoring old house features, understanding these age-related vulnerabilities becomes even more important.
How to Assess the Damage Before You Start
Not all chips are created equal. Before you grab the epoxy and start mixing, take five minutes to properly assess the damage. This evaluation determines whether you’re looking at a 30-minute DIY fix or a situation that needs professional attention.
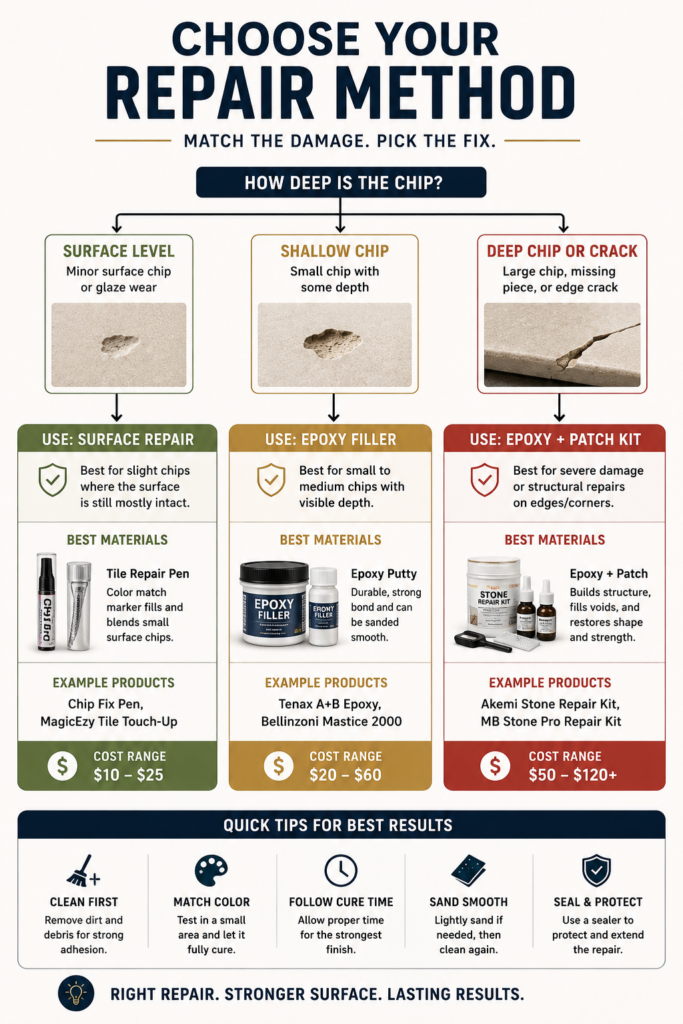
Start by examining the chip’s depth. Run your fingernail across it. If the chip is only in the glazed surface layer and you can’t feel a significant depression, you’re dealing with a superficial chip. These are the easiest to repair and often invisible after proper filling and painting. If your fingernail catches noticeably or the chip extends into the tile body (the bisque underneath the glaze), you’ll need a more robust repair approach.
Next, check for cracks radiating from the chip. Use a flashlight held at an angle to reveal hairline cracks you might miss in normal lighting. If you see cracks extending toward grout lines or reaching the tile edges, the tile’s structural integrity is compromised. This often happens when the underlying substrate has failed or when the tile experiences ongoing stress from an unstable floor.
Location matters significantly. Chips in low-traffic areas like behind a stove or under a cabinet are purely cosmetic. But chips in high-traffic walkways, shower floors, or kitchen work zones will experience continued stress and may worsen if not properly repaired. These high-use areas typically benefit from professional repair methods that offer better durability.
Finally, consider the tile type. Ceramic and porcelain tiles respond differently to repair materials. Glazed tiles accept paint and epoxy more readily than unglazed tiles. Natural stone tiles like marble or slate require specialized fillers that match the stone’s texture and absorption properties.
What Materials and Tools Do You Actually Need?
Walking into a hardware store without a clear list leads to confusion and often the wrong products. Here’s what you need based on the most common repair scenarios, starting with the essentials and moving to specialized items.
For Basic Surface Chips (glazing only):
- Two-part epoxy filler or specialty tile repair compound
- Denatured alcohol or acetone for cleaning
- Small artist’s brush or toothpick for application
- Matching paint or nail polish (acrylic enamel works best)
- Clear polyurethane or epoxy sealer
- Fine-grit sandpaper (400-600 grit)
- Clean cloths and painter’s tape
For Deeper Chips (into tile body):
- Tile repair kit with multiple color options
- Mixing palette and applicator sticks
- Putty knife or plastic scraper
- Primer for porous tile bodies
- All items from basic repair list above
Color matching presents the biggest challenge for DIY repairs. Professional tile repair kits offer 20-40 standard colors, but custom tiles or aged tiles with patina may require custom mixing. Expect to spend 15-20 minutes testing color combinations on a hidden area before applying to the visible chip. Most hardware stores in the Hudson Valley region carry tile repair kits ranging from $15-$45, with professional-grade kits costing $60-$120.
The quality of your epoxy matters more than you’d think. Cheap craft epoxies yellow over time and don’t bond well to glazed surfaces. Look for products specifically labeled for tile or ceramic repair. These formulations remain clear, resist yellowing under UV exposure, and create stronger bonds with glazed surfaces.
For color matching, bring a broken tile piece or take a high-resolution photo in natural daylight. Many paint stores can create custom color matches, though this service works best for larger repairs where precision matters. For small chips under a quarter-inch, nail polish in a matching shade often provides the perfect solution because it comes pre-mixed, applies smoothly, and dries with a natural gloss.
How to Repair a Small Surface Chip Step by Step
Let’s start with the most common scenario: a small chip in the glazed surface that hasn’t penetrated to the tile body. This repair takes about an hour including drying time, and when done correctly, the repair becomes virtually invisible from normal viewing distance.
Step 1: Clean the damaged area thoroughly. Use denatured alcohol on a clean cloth to remove all dirt, grease, and soap residue. Any contamination prevents proper adhesion. Let the area dry completely, which takes about 5-10 minutes.
Step 2: Prepare your work area. Apply painter’s tape around the chip, leaving about a quarter-inch border. This creates clean edges and prevents epoxy from spreading onto undamaged glaze. Work in a well-ventilated area because epoxy and paint fumes accumulate quickly in bathrooms and small kitchens.
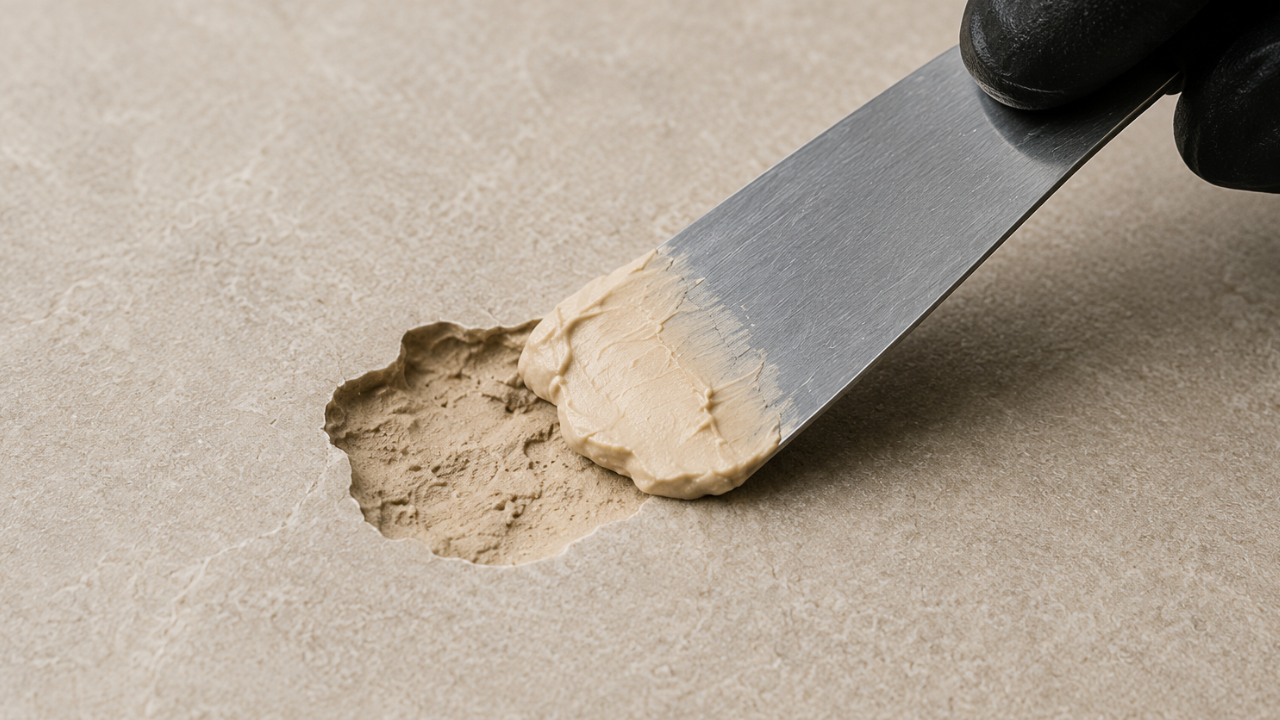
Step 3: Mix and apply the epoxy filler. If using two-part epoxy, mix equal amounts on a disposable surface according to package directions. You have about 5-10 minutes of working time before it starts to harden, so work efficiently. Using a toothpick or small applicator, fill the chip slightly above the surrounding surface. The epoxy will shrink slightly as it cures, and you’ll sand it level later.
Step 4: Let it cure completely. Don’t rush this step. Most epoxies need 24 hours to reach full hardness, though some quick-cure formulas set in 4-6 hours. Avoid walking on the tile or exposing it to moisture during this time.
Step 5: Sand the repair level. Once fully cured, use 400-grit sandpaper wrapped around a small block to sand the epoxy flush with the surrounding glaze. Sand gently in one direction, checking frequently. You want the repair perfectly level without sanding into the original glaze. Wipe away dust with a damp cloth and let dry.
Step 6: Apply matching color. This is where artistry meets repair work. Using your matched paint or nail polish, apply thin coats over the filled area. Multiple thin coats look better than one thick coat. Let each coat dry 15-20 minutes before applying the next. Usually two to three coats provide full coverage.
Step 7: Seal and protect. Once the paint is completely dry (wait at least 4 hours), apply a thin coat of clear polyurethane or epoxy sealer. This protects the paint from wear and adds the glossy finish that matches the surrounding glaze. One coat is usually sufficient for most repairs.
The entire process requires patience more than skill. Rushing any step, particularly the curing times, leads to soft repairs that fail within weeks. When you’re working through a comprehensive home restoration process, tile repairs often get grouped with other finish work to maximize efficiency.

What About Deeper Chips That Expose the Tile Body?
When a chip penetrates through the glaze into the porous tile body underneath, you’re dealing with a more complex repair. The exposed bisque absorbs moisture and stains easily, and the repair needs to bond with both the glazed edge and the porous interior.
The process starts similarly with thorough cleaning, but you’ll add a priming step. The porous tile body needs a primer coat to seal it before applying filler. Use a small artist’s brush to apply a thin layer of clear epoxy or specialized tile primer to the exposed bisque. Let this dry completely, usually 2-4 hours.
For the fill material, consider tile repair putty instead of liquid epoxy. These putties come in various colors and can be blended to match your tile. They’re thicker than liquid epoxy, making them easier to control in deeper voids. Knead the putty according to package directions, then press it firmly into the chip, slightly overfilling the void.
Professional tile repair putties cure harder than standard epoxies and resist moisture absorption better in wet areas like showers and bathroom floors. These specialized products cost $25-$60 per kit but provide repairs that last 5-10 years or more in high-moisture environments, compared to 2-3 years for standard epoxy repairs in the same conditions.
Once the putty cures (check manufacturer’s instructions, typically 24 hours), sand it smooth and proceed with color matching as described in the surface chip section. Deeper repairs often show more easily because you’re essentially creating new tile surface rather than just filling a void, so expect to spend more time on color matching and finishing.
When Should You Call a Professional Instead?
DIY repairs work beautifully for isolated chips and minor damage, but some situations genuinely need professional assessment and repair. Knowing when to call in experts saves you money in the long run by preventing failed repairs and addressing underlying problems.
Call a professional when you notice multiple chips appearing in the same area. This pattern suggests substrate failure, improper installation, or structural movement beneath the tile. Fixing individual chips won’t solve the underlying problem, and you’ll keep chasing new damage. A professional can assess the substrate, identify movement issues, and recommend whether spot repairs or broader tile replacement makes more sense.
Chips near or extending into grout lines often indicate bigger problems. The tile may be loose or the grout joint may have failed, allowing the tile to flex. Professionals have tools to test tile adhesion without causing more damage and can properly reattach loose tiles while repairing chips.
For valuable or antique tiles, especially those found in historic Hudson Valley homes, professional restoration specialists bring expertise in matching historical materials and techniques. They maintain databases of discontinued tile patterns and have access to specialty pigments and glazes that recreate period-appropriate finishes. Attempting DIY repairs on irreplaceable vintage tiles risks permanent damage.
Shower floors and walls present unique challenges because repairs must withstand constant moisture exposure. Professionals use waterproof epoxies and sealers rated for wet environments and know proper application techniques that prevent water infiltration. A failed DIY shower repair can lead to water damage behind walls, creating problems far more expensive than the original chip repair.
Professional tile repair in the Hudson Valley region typically costs $150-$400 for standard repairs, depending on tile type, damage extent, and accessibility. Complex jobs involving custom color matching, multiple repairs, or substrate work can range from $400-$800. Mobile repair services charge premiums of 20-30% but eliminate the need to remove and transport damaged tiles.
How Can You Prevent Future Tile Chips?
Once you’ve invested time in repairing chips, you naturally want to prevent new ones from forming. Most preventive measures are simple and inexpensive, requiring more awareness than effort.
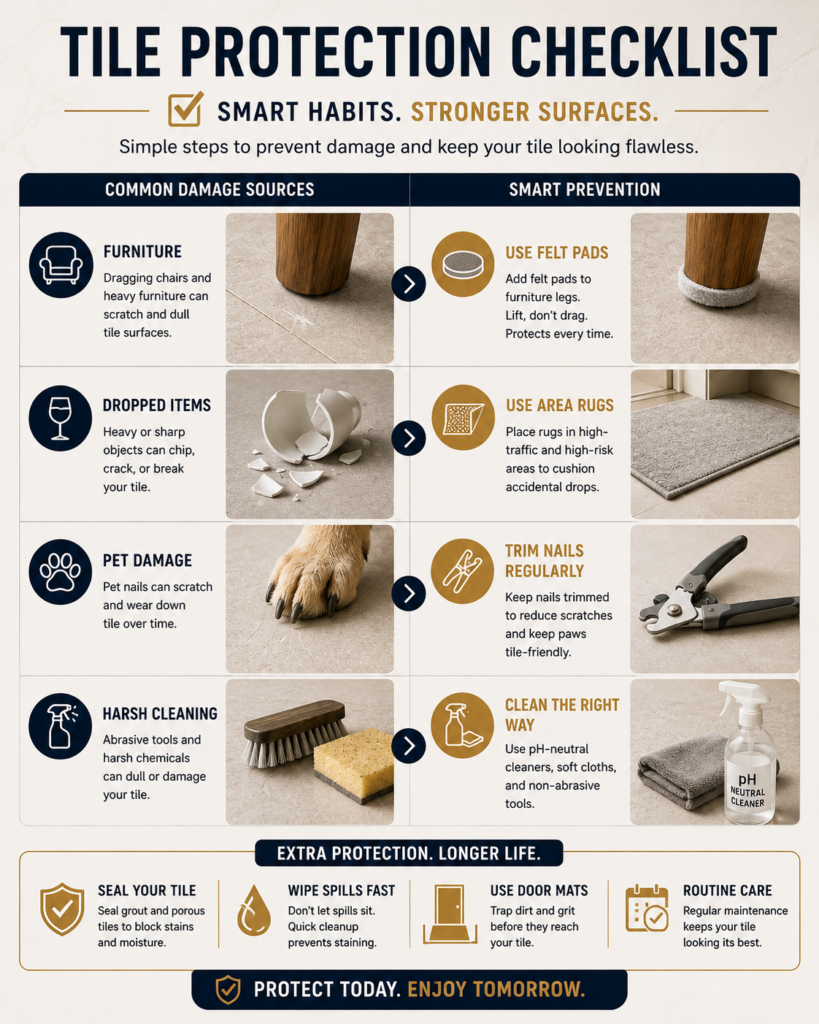
Install felt pads under all furniture legs that contact tile floors. Replace these pads every 6-12 months as they compress and lose effectiveness. When moving furniture, always lift rather than drag. Those few seconds of extra effort prevent damage that takes an hour to repair.
Place rugs or runners in high-traffic areas, especially in kitchens where items frequently drop and in entryways where debris from outside gets tracked in. The rug absorbs impact energy that would otherwise chip tiles. Choose rugs with non-slip backings to prevent shifting that causes its own problems.
Be mindful when using ladders or step stools on tile floors. Place a thin piece of plywood or cardboard under ladder feet to distribute weight. This simple step prevents the concentrated pressure points that crack tiles, particularly older tiles with brittle glazes.
In kitchens, use caution zones near the range and sink where cast iron cookware and heavy dishes move frequently. Consider keeping a small rug or mat in front of the sink specifically for the time you’re doing dishes. It catches dropped items and provides cushioning.
For homes with pets, keep their nails trimmed. Dog and cat nails create thousands of tiny impacts daily, and while each one seems insignificant, the cumulative effect chips glaze over time. Regular nail trims reduce this wear dramatically.
Regional Considerations for Hudson Valley Homeowners
Hudson Valley homes present unique tile repair considerations because of the region’s architectural history, climate patterns, and material availability. Understanding these local factors helps you make smarter repair decisions.
Many Hudson Valley properties built between 1890 and 1950 feature original tile work in entryways, bathrooms, and kitchens. These vintage tiles often came from now-defunct regional manufacturers, making exact replacements impossible. Repair becomes your only option for maintaining historical integrity, and the techniques described in this guide work particularly well for these older installations.
The region’s freeze-thaw cycles affect tiles differently than in more temperate climates. Exterior tiles or tiles in unheated areas experience expansion and contraction that weakens grout and adhesive bonds over time. If you’re repairing chips in mudrooms or enclosed porches, use flexible epoxies rated for temperature fluctuation. Standard epoxies can crack during winter temperature swings.
Local hardware stores in Poughkeepsie, Kingston, and Beacon typically stock standard tile repair supplies, but specialty color-matching services and professional-grade repair kits may require ordering online or visiting larger home improvement centers in Newburgh or Albany. Plan for 3-5 business days if ordering specialty materials, particularly during peak renovation season from April through October when supply shortages are more common.
Humidity from the Hudson River affects tile installations, particularly in riverside communities. Higher humidity can slow epoxy curing times by 20-30% compared to manufacturer specifications. When planning repairs, add extra drying time if you’re working during humid summer months or if your home lacks climate control.
Frequently Asked Questions
Can a chipped tile be fixed?
Yes, most chipped tiles can be successfully repaired without replacement. Surface chips affecting only the glaze respond well to epoxy fillers and matching paint, creating nearly invisible repairs. Deeper chips that expose the tile body require more involved repairs but are still manageable for most homeowners. Only severely cracked tiles or those with damage indicating structural problems typically require full replacement.
How much does it cost to repair a chipped tile?
DIY tile chip repairs cost between $15 and $60 for materials, depending on the repair method and whether you need specialized color-matching products. Professional repairs range from $150 to $400 per tile for standard work, with complex jobs or multiple tiles costing more. The investment often makes sense compared to replacing entire sections of tile, particularly for vintage or custom tiles.
How much to repair a chipped tile?
Material costs for DIY repairs typically run $15-$60 depending on tile type and damage severity. A basic repair kit with epoxy, color-matching putty, and sealer costs around $25-$40. Professional repair services in the Hudson Valley region charge $150-$400 for standard repairs, with pricing varying based on tile accessibility, color matching complexity, and whether substrate work is needed.
How to disguise a chipped tile?
For chips you can’t or don’t want to repair immediately, strategic placement of furniture, rugs, or decorative items can hide damage temporarily. In kitchens, small appliances or decorative bowls work well. For floor tiles, area rugs provide effective coverage. However, disguising rather than repairing allows moisture and dirt to enter the chip, potentially causing more damage over time. Use disguising as a temporary solution while you gather repair materials or schedule professional help.
How do you repair tile without removing it?
In-place tile repair uses epoxy fillers or repair putties applied directly to the chip without removing the tile. Clean the damaged area, apply epoxy or putty to fill the void, let it cure completely, sand smooth, then color-match with paint and seal. This method works for chips, small cracks, and surface damage. Only severely damaged tiles with compromised structural integrity or major cracks require removal and replacement.
Making Your Tile Repair Last
You’ve completed the repair, and from normal viewing distance, the chip has disappeared. But the real test comes in the weeks and months ahead. Proper maintenance ensures your repair lasts years rather than months.
Avoid harsh cleaning chemicals on repaired areas for the first month. The epoxy and sealer need this time to fully cure and develop maximum chemical resistance. Stick with pH-neutral cleaners and soft cloths during this period. After the initial month, you can return to normal cleaning routines, though you should still avoid abrasive scrubbers directly on repairs.
Inspect repairs every few months, especially in high-traffic areas. Look for any edge lifting, color fading, or seal degradation. Catching problems early means a quick touch-up rather than a complete redo. Keep your repair materials for at least a year so you can perform touch-ups with the exact products and colors you originally used.
Remember that even the best repairs have limits. If you notice the same area chipping repeatedly or developing new cracks, that signals an underlying problem beyond the surface damage. At that point, investigation into substrate stability, installation quality, or structural movement becomes necessary.
Get Professional Help When You Need It
Understanding how to fix chipped tile empowers you to handle minor damage confidently and save money on repairs that don’t require professional intervention. The techniques in this guide work for the majority of chip repairs homeowners encounter, particularly those small frustrating chips that catch your eye but don’t compromise tile function.
However, some situations benefit from professional expertise. If you’ve assessed your tile damage and found multiple chips, cracks extending to grout lines, or signs of substrate failure, professional assessment protects your investment. Historic tiles, complex color matching, or wet area repairs often justify the cost of hiring specialists who have the tools and experience to deliver lasting results.
For homeowners in Hudson Valley, NY dealing with tile damage beyond simple chips or considering broader renovation projects, Chiusano Design Build LLC brings decades of experience working with both historic and modern tile installations. Whether you need a single tile expertly repaired to match irreplaceable vintage work or you’re planning comprehensive updates that include tile work, professional guidance ensures the job gets done right. Call 845-201-9450 to discuss your specific tile situation and get expert recommendations tailored to your home’s needs.