Preserving History: A Step-by-Step Look at Restoring Older Homes in Hudson Valley
Old homes tell a story but restoring them takes the right mix of respect, craftsmanship, and planning. In New York’s Hudson Valley, where centuries-old Colonials, Victorian farmhouses, and mid-19th century cottages dot the landscape, homeowners cherish the rich architectural heritage.
Restoring an older home here means preserving its original charm – from hand-hewn beams to intricate moldings – while carefully upgrading it for modern comfort, safety, and value. It’s a balancing act between past and present that requires thoughtful strategy and plenty of patience.

In this guide, we’ll walk through the restoration process step by step, focusing on how to maintain historical character, comply with local preservation rules, and ensure your hard work pays off in long-term comfort and resale value.
Key Takeaways:
- Thorough Assessment is Critical: Begin by evaluating the home’s structure and systems – foundations, roof, electrical, plumbing – with professionals. Identify any issues like structural damage, outdated wiring, lead paint or asbestos that must be addressed for safety
- Define Restoration Goals Early: Decide how historic vs. modern you want the home to be. Some homeowners pursue accurate period restoration, while others prefer a blend of preserved features with modern amenities. Aim to retain character-defining elements while planning sensible upgrades for comfort and code compliance
- Know Local Regulations: If your home is in a designated historic district or landmarked, local regulations may require approval for exterior changes. Always check with Hudson Valley town preservation boards – often a Certificate of Appropriateness is needed before changing siding, windows, roofs, etc., to ensure changes fit the historical context.
- Hire the Right Restoration Team: Look for contractors, architects, and artisans experienced in historic homes. Preservation projects demand specialized skills and an appreciation of traditional construction methods. A team that understands plaster walls, antique fixtures, and old-growth timber will preserve original materials wherever possible.
- Safety and Structure First, Design Second: Always repair the “bones” of the house first – foundation, framing, roof – and update essential systems (electrical, plumbing, HVAC) to code before focusing on cosmetics. This ensures the restored home is safe and durable for decades to come. Only then move on to refinishing floors or adding modern touches.
Now, let’s delve into each step of restoring an older Hudson Valley home in detail:
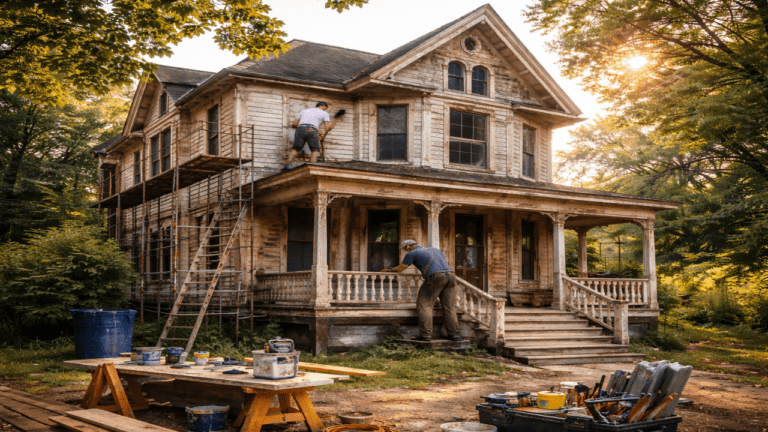
Step 1 — Evaluate the Home’s Existing Condition
Every successful restoration starts with a clear-eyed evaluation of the home’s current condition. Old houses can hide a multitude of issues, so it’s wise to hire a structural engineer and a home inspector who specialize in historic properties. These professionals will conduct a top-to-bottom assessment of the building’s integrity and systems:
- Foundation and Structure: The foundation is a top priority since it bears the load of the entire house. Inspect for cracks, shifting, or water damage in the foundation and support beams. Even slight foundation settling can lead to telltale signs like sloping floors or wall cracks. If the home sits on a stone or brick foundation (common in 18th–19th century Hudson Valley homes), look for mortar deterioration or moisture infiltration that might require reinforcement.
- Roof and Framing: Examine the roof for leaks, missing shingles, or sagging rafters. Older homes often have wooden shake or slate roofs that may be past their prime. Ensure the roof structure is sound and capable of protecting the house before proceeding with interior work.
- Outdated or Hazardous Materials: Identify any hazardous materials that were common in old construction. For example, homes built before the late 1970s frequently contain asbestos in insulation, floor tiles, or siding. Lead-based paint is almost a given in houses built before 1978 – you should assume any pre-1978 home has some lead paint present. These materials aren’t necessarily dangerous if undisturbed, but planned renovations could release toxic fibers or dust. Plan for professional testing and remediation; removal of asbestos may be required if it will be disturbed during remodeling
- Mechanical Systems: Have the electrical, plumbing, and HVAC systems inspected. Many historic Hudson Valley homes still have antiquated knob-and-tube wiring or ungrounded outlets, which pose fire and safety risks and won’t meet modern electrical code. Old, faulty wiring is a serious fire hazard – electrical malfunctions are among the leading causes of house fires, according to FEMA.
Step 2 — Define Your Goals: Preservation vs. Renovation ????
With the home’s condition report in hand, the next step is to clarify your restoration goals. Ask yourself: How pure do I want the restoration to be? Homeowners differ – some dream of a historically accurate restoration, while others want a more modernized living space that still retains period charm. Defining the balance between preservation and modernization upfront will guide all your decisions. Start by making a list of what to preserve, what to repair or upgrade, and what to fully renovate or add anew.
Clarify your priorities:
- Historical Authenticity: If preserving authenticity is paramount, your project will lean more toward true restoration. You’ll aim to keep or replicate original materials and design wherever possible. According to the U.S. National Park Service’s standards, restoration means depicting the home as it appeared at a particular time in history, removing features from other eras, and reconstructing missing elements from the restoration period.
- Rehabilitation/Modernization: If comfortable living and efficiency take precedence, you’ll lean toward rehabilitation, which is about adapting a historic structure for modern use while retaining its character. This might mean preserving the exterior and key character-defining elements inside, but making more visible changes to accommodate a modern lifestyle (open up a wall, expand a porch, install a new kitchen, etc.). The goal is to balance new and old – to “strike a balance between retaining original features and accommodating new technologies and equipment,” as preservation experts say.
Related: Top 10 Kitchen Design Trends Dutchess County Homeowners Are Loving Right Now
Step 3 — Understand Local Historic District Regulations ????️
Restoring an older home in the Hudson Valley isn’t just a personal endeavor – in many cases, it’s a community matter too, thanks to local historic preservation laws. Many Hudson Valley towns and villages have designated historic districts or landmark properties, especially in areas with rich architectural heritage (for instance, Kingston, Hudson, Beacon, Newburgh, etc.). If your home is in such a district or individually landmarked, you will likely need approvals from a local historic preservation commission (HPC) for certain work – particularly exterior changes. It’s essential to research and comply with your local regulations before swinging a hammer:
- Certificate of Appropriateness (CoA): Most historic districts require homeowners to obtain a Certificate of Appropriateness for exterior alterations. This certificate is basically an official sign-off that your planned changes (like replacing siding, altering the façade, changing windows, adding a porch, etc.) are appropriate to the historic character of the property and district. For example, the City of Kingston’s preservation ordinance mandates that any project involving the exterior of a historic property visible from a public street must be reviewed by the Historic Landmarks Preservation Commission (HLPC) before a building permit can be issued kingston-ny.gov. That means even if you’re just planning to repaint the exterior or restore a front door, you may need to submit an application and get approval first.
- What Changes Trigger Review: Generally, exterior work is the focus – things like roof material changes, installing new windows or shutters, building an addition, demolishing a part of the structure, or even significant landscape changes in some cases. Ordinary maintenance and repairs using the same materials usually do not require approval (for instance, repainting in the same color, or repairing a porch with identical materials). However, anything that alters the appearance typically does.
- Consult Preservation Bodies: Early in your planning, contact your town’s preservation commission or historic society. They can tell you whether your home is regulated and what the process is. Many Hudson Valley communities have preservation boards eager to advise homeowners. They might provide design guidelines or examples of acceptable materials (for instance, what kind of replacement window design is approved, or acceptable roofing for a Victorian-era home). Engaging with them can save time – and they may offer helpful resources like historic photos or information about your home’s original look. As a bonus, showing that you’re approaching the project respectfully can build goodwill with the commission when you submit your CoA application.

- Permitting Process: The historic review process typically goes hand-in-hand with building permits. The sequence is often: you submit plans to the historic commission, attend a meeting where they review and approve (or suggest changes), then you receive a Certificate of Appropriateness, and then you include that when applying for your building permit. It can add a few weeks or more to the project timeline, so plan accordingly. For example, in Kingston once the HLPC approves and issues a CoA, you still must apply for the building permit and get it approved by the building department before work starts.
- Working Within the Rules: If the idea of restrictions sounds daunting, remember the goal is to protect your home’s and neighborhood’s value. Design guidelines prevent unsightly or historically incompatible alterations that could diminish property values (e.g., replacing original wood clapboard with vinyl siding might be prohibited). In practice, rules usually encourage “repair over replacement” – for instance, repair original wood windows rather than wholesale replacing – and if replacement is needed, to use in-kind materials.
Step 4 — Build a Restoration-Ready Team
One of the most crucial investments you’ll make in a historic home restoration is hiring the right team of professionals. Restoring an old house is not a run-of-the-mill remodeling job – it requires people who understand traditional construction techniques, historic materials, and the delicate nature of working with aging structures. As you assemble your crew, prioritize relevant experience and a passion for preservation. Who you may need on your team:
- Structural Engineer: As noted in Step 1, a licensed structural engineer is vital if your home has structural issues (sagging floors, compromised beams, etc.) or if you plan major changes (like removing walls or adding on). They ensure any interventions will keep the house standing strong. It’s best if the engineer has worked on historic buildings before, as they’ll be familiar with old building methods (post-and-beam framing, unreinforced masonry, etc.) and can design solutions that are sensitive to the original structure.
- Architect (with Historic Expertise): An architect experienced in historic restoration can be invaluable, especially for complex projects. They can develop a master plan that respects the home’s character while meeting your living needs. A preservation-savvy architect will identify character-defining elements to save, source period-appropriate materials, and navigate code issues creatively. They also often handle the interface with historic commissions by preparing drawings that demonstrate appropriate design. Look for credentials or portfolio projects involving older or landmark homes.

- General Contractor / Builder: Your general contractor (or builder) will coordinate the day-to-day work. Choose a contractor with proven experience on older homes or historic renovations. Ask to see examples of their past restoration projects – local references are gold. A contractor who has, say, restored a 1920s Craftsman or an 1870s farmhouse in the Hudson Valley will know how to solve typical issues (like how to feather new wood flooring into old, or where to source plaster repair specialists).
- Specialty Craftspeople: Depending on your home’s features, you might need artisans for specific tasks: wood window restorers, stained-glass specialists, historic plaster restoration experts, decorative painters, or millworkers who can recreate moldings. In the Hudson Valley and greater New York, there are preservation tradespeople who focus on old homes – local preservation organizations or the state historic preservation office can often provide referrals.
- MEP Professionals: “MEP” stands for mechanical, electrical, plumbing – the core systems of the house. Often these need significant upgrades in an old home. Consider engaging an electrician and plumber who have worked in older homes, because they’ll be used to retrofitting new systems into tight, unconventional spaces with minimal damage. If installing HVAC (like central air) where none existed, an HVAC designer or contractor with old-house experience can figure out how to add ducts or mini-split units in a discreet way (sometimes older homes use high-velocity mini-duct systems or cleverly hidden duct chases to preserve aesthetics). In some cases, an engineer or designer might be needed to plan these systems in detail (some architects cover this, or you hire a separate engineering firm).
(For more tips on picking the right contractor, see our guide on How to Choose the Right Remodeling Contractor – it offers advice on vetting experience, checking credentials, and ensuring a good fit for your specific project.)
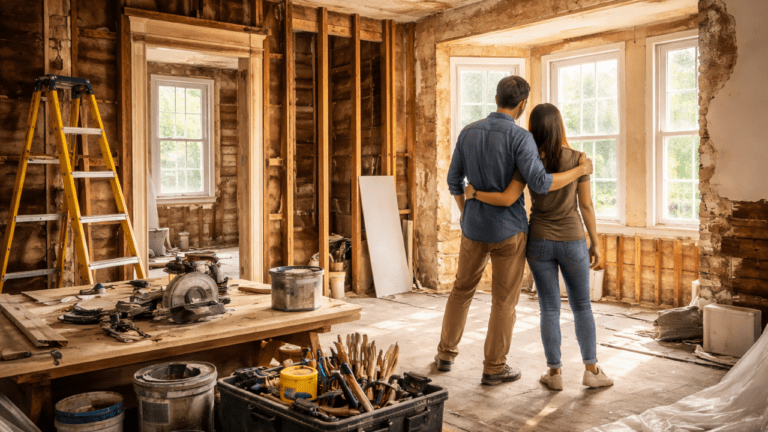
Step 5 — Restore Structural and Essential Systems First
Once planning and team-building are underway, it’s time to get your hands dirty – or rather, your team’s hands. In a historic home restoration, the first phase of work should focus on the “bones” of the house and its critical systems. It can be tempting to jump into ripping out that 1970s carpeting to refinish hardwood floors, but resist the urge! Structural stability and safety come first, always. Prioritize any repairs or upgrades that keep the house dry, solid, and compliant with building codes before moving on to aesthetic restorations. Key priorities typically include:
- Foundation and Drainage: Address any foundation issues identified in your initial inspection. This might involve reinforcing or underpinning a settling foundation, repointing a stone foundation’s mortar, or improving drainage around the house (e.g. installing French drains or grading the landscape) to prevent water infiltration. A dry, stable foundation is fundamental – many an old house has been saved from decay by fixing guttering and grading to keep the basement dry! Make sure any water damage or rot in sill beams or lower walls is repaired with proper materials before other work.
- Structural Framework: If there are sagging floor joists, bowing walls, or roof rafter problems, now’s the time to fix them. Carpenters may sister new lumber alongside weakened old joists, or a timber frame specialist might swap in a new beam (using appropriate wood species and techniques to maintain historical integrity). When reinforcing, use compatible materials.
- Roof and Building Envelope: Ensure the roof is in good repair or replace it if needed. A leaky roof can quickly ruin all other restoration efforts, so this is non-negotiable. If replacing, see if you can use materials similar to the original (for instance, wood shingles on a Colonial farmstead or standing-seam metal on an 1800s village house) if allowed by budget and regulations. Also, fix or replace gutters and downspouts to channel water away. Check exterior walls for any large gaps or failing sections that need repair – e.g., clapboard siding that’s missing pieces or masonry walls with cracks. Closing up the exterior envelope will protect the interior work to come.
- Electrical System: Bring the electrical wiring up to modern standards. This usually means completely rewiring if the home still has very old wiring. Not only is this critical for safety (old wiring can be frayed or undersized, posing fire risks), but modern life demands more circuits and capacity. An electrician will install a new service panel, new circuits, grounded outlets, GFCI protection where needed, etc. They can do this while walls are open for other work.
- Plumbing System: Similarly, assess if the plumbing needs overhaul. Old galvanized pipes eventually corrode and clog; if you have those, plan to replace with copper or PEX. Also check the sewer line – some older homes still have clay sewer pipes that may be cracked or root-infested, which could require replacement. It’s much easier to do plumbing work before walls and floors are finished. If adding bathrooms or moving fixtures as part of your renovation, this phase will include running new supply and drain lines accordingly.
Related: How to Plan a Stress-Free Bathroom Renovation in Hudson Valley - Heating/Cooling (HVAC): If the home has an ancient furnace or boiler, you’ll likely replace it with a new, efficient system. Plan out HVAC upgrades early. For example, if adding ductwork for central air or heat, you might need to cut channels through framing or floors; doing so is acceptable now, before those surfaces are restored.
Step 6 — Preserve and Refinish Original Materials
With the structural and system heavy lifting done, the exciting part begins: bringing your home’s historic beauty back to life. Step 6 is all about carefully preserving, repairing, and refinishing the original materials and features that give your old house its unique character. This is the heart and soul of a historic restoration – the detail work that will make your home shine and maintain its authentic charm. Key areas of focus include:
- Wood Floors: Many Hudson Valley older homes boast lovely hardwood floors – perhaps wide-plank pine in an 18th-century home, or oak strip flooring in a Victorian. Rather than replacing, you’ll usually want to refinish the original floors. This involves repairing any damaged boards (often using salvaged wood of the same species and size for patches), then sanding and re-staining/sealing.
- Plaster Walls and Ceilings: Lots of historic homes have real plaster walls (as opposed to modern drywall). Plaster can develop cracks or holes over time, but it’s often repairable. Skilled plaster restorers can fill cracks, stabilize loose plaster, and patch holes with traditional techniques so the wall retains its original texture and solidity. Where plaster is too far gone (say, extensive water damage), you might replace sections with drywall or new plaster – but even then, you can finish it to match the old surface. The key is not to hastily gut all plaster walls; they are part of the historic fabric and have qualities worth keeping (acoustic, durability, the way they shape moldings, etc.). Repair wherever feasible – “when feasible, repair is preferred over replacement” for historic materials.
- Windows and Doors: Original windows, with wavy glass and solid wood frames, contribute greatly to a home’s character. Rather than swapping them for new, consider restoring the original windows. This can involve removing them, stripping paint, repairing any rot in the frames, reputtying loose glass panes, and adding weatherstripping. Properly restored wood windows paired with storm windows can approach the efficiency of modern windows, and you preserve the aesthetic (plus avoid the landfill).

- Trim, Moldings, and Built-ins: A huge part of an old home’s charm lies in its millwork – the baseboards, crown moldings, staircases, built-in bookcases, etc. These should be meticulously preserved. If you removed trim carefully earlier to run electrical, now’s the time to reinstall it. Scrape off layers of old paint (safely, if lead is present) and repaint or refinish the wood as appropriate. If some trim was missing or too damaged, have replicas milled to the exact profile – new pieces should “match the physical and aesthetic characteristics of the historic features,” including design, dimensions, and finish.
- Fireplaces and Hardware: Many older homes have decorative elements like fireplace mantels, cast iron grates, or original brass hardware. These might just need cleaning and minor repair. Carefully strip paint off detailed wood mantels, polish antique hardware (or leave a bit of patina – that’s up to taste), and make sure things like sash locks on windows or old door locks are functional (there are specialists who can refurbish antique locks). Each of these little pieces adds up to an authentic feel.
Step 7 — Carefully Introduce Modern Comforts
Preserving history doesn’t mean living like it’s 1880. By Step 7, your home’s original features are saved and shining – now it’s time to integrate modern comforts and upgrades in a thoughtful way. The goal is to enhance livability (think energy efficiency, comfort, smart tech) without detracting from the historic character.
This often means making updates as unobtrusive or “invisible” as possible, or blending them sympathetically with the old design. Here are key modern improvements and how to introduce them carefully:
- Insulation and Energy Efficiency: Many old homes were built with little or no insulation, which can make them drafty and costly to heat. Adding insulation is a top comfort upgrade. However, you must do it sensitively to avoid moisture issues or damage to historic materials. Often, blown-in cellulose insulation can be added to wall cavities by drilling small holes (which are later patched) rather than removing entire interior walls – preserving plaster. Attic insulation is a low-impact must-do; it can usually be added above the ceiling without anyone the wiser. Just ensure adequate ventilation to avoid trapping moisture.
- Heating and Cooling Upgrades: If you’ve decided to add central air conditioning or a modern heating system, aim to keep equipment out of sight. For instance, install ductwork in attics, basements, or discreet chases so that you don’t have visible ducts in historic rooms. Sometimes high-velocity mini-duct systems use small 2-inch ducts that can be threaded through walls with minimal impact.
- Modern Kitchen and Bathrooms: Kitchens and baths are usually where modern functionality trumps historic accuracy, especially if the originals are long gone or not suited for today. The key is to renovate these spaces in a way that doesn’t jarringly conflict with the rest of the house. That might mean choosing classic or historically-inspired designs – e.g., a farmhouse sink and Shaker-style cabinets in a 19th-century home’s kitchen, or white subway tile in a bathroom which has been popular for over a century.
Related: Luxury Bathroom Upgrades That Pay Off in the Hudson Valley Market

- Lighting and Electrical Conveniences: Modern lighting makes a home more usable, but you can integrate it subtly. Whenever possible, use existing electrical routes or hidden areas to add new lighting. For example, if you want recessed lights in a ceiling, try to place them between joists from above (in the attic) to avoid damaging a decorative plaster ceiling. Or use surface-mounted fixtures that align with the home’s style (there are beautiful period-reproduction chandeliers, sconces, etc., that hide the fact they’re LED inside).
- Discreet Tech: If you desire modern amenities like home audio speakers or a home theater, find ways to incorporate them creatively. Built-in speakers can be ceiling-mounted and painted to match, or even hidden behind historic grilles. Wires for internet/network can be run through basements or crawlspaces to various rooms (or consider mesh Wi-Fi to avoid too much wiring). It’s absolutely possible to enjoy all the tech of a 21st-century home inside your 19th-century gem – you just plan the tech infrastructure along with other system upgrades so it’s largely behind the scenes.
- Life Safety Improvements: A truly important modern comfort is safety. Install hard-wired smoke and carbon monoxide detectors (with battery backup) throughout the home – this can be done during electrical work and is required by code now. If your home has multiple levels or a tricky layout, maybe invest in a monitored alarm system. These upgrades don’t impact appearance much (detectors are small, and you can choose low-profile ones).
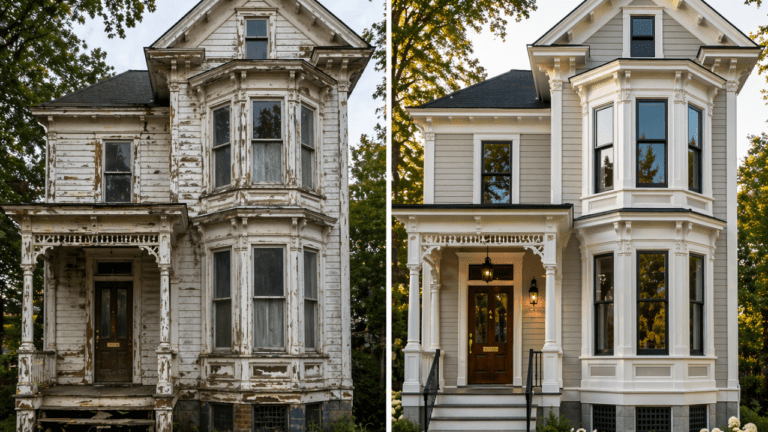
Step 8 — Showcase Before and After Highlights
Restoring an older home is a journey – often a long one – and Step 8 is about celebrating the transformation. At this stage, as the project nears completion, it’s incredibly rewarding to compile “before and after” highlights to see just how far the house has come. Not only is this satisfying for you as the homeowner, but it’s also helpful for future resale and for inspiring others who love historic homes. Here’s how to showcase and savor your hard work:
- Document Each Room’s Transformation: Hopefully, you took plenty of “before” photos (if not, even mid-renovation photos can serve as “befores”). Now take well-lit, high-quality shots of the finished spaces from similar angles.
- Highlight Restored Details: Zoom in on some of the details you painstakingly restored. Did you refinish an original clawfoot tub? Show the tub when it was rust-stained and dull next to how it looks now shiny-white in the new bathroom. If you uncovered and repaired an old leaded glass transom window, do a close-up before/after of that. These little vignettes emphasize the preservation successes. They also can be conversation pieces if you ever give friends or potential buyers a tour, demonstrating the value added by quality craftsmanship.
- Emphasize Preservation Wins: Make note of where you preserved original elements versus where you introduced new elements. For example, maybe your before living room had a time-worn (but beautiful) parquet floor hidden under carpet, and the after shows it restored to glory – mention that. Or showcase that the mantel is original but the fireplace surround tile is new reproduction. This helps tell the story that historic character was not lost, only enhanced. For many old-home lovers (and buyers), seeing those original elements intact is a huge plus.
- Show Modern Improvements Discreetly: It can also be fun to highlight how modern interventions were blended in. Perhaps do a before/after of the basement, which was once a damp cellar and is now a cozy family room or guest suite (as often seen in finished basements). The contrast can be dramatic, showing how much usable space you’ve gained without any outward expansion. If you turned a closet into a second bathroom, show that clever repurposing. These transformations underscore how the home’s functionality improved.
- (For an example of creative reuse, see how local families are converting basements into livable spaces in our related post on Basement Finishing Ideas for Hudson Valley Homes – internal link.)
- Curb Appeal Overhaul: Don’t forget the exterior. Often an old house’s curb appeal is night-and-day after restoration. Show the overgrown, peeling-paint “haunted house” look before, and the freshly painted, landscaped after. If you had to replace the roof or rebuild the front steps, those improvements will be obvious in photos. A beautiful historic exterior not only increases pride but also property value, as first impressions count.
- Professional Photography: If this is your forever home and you want to relish it, or if you plan to market the home, consider hiring a professional photographer to take some final shots. They can capture the lighting and angles perfectly, almost like an architectural magazine spread, to truly do justice to the craftsmanship. These images can also be useful if you ever need to document the home for insurance or appraisal purposes.
Ready to Start Restoring Your Hudson Valley Home?
Embarking on a historic home restoration in the Hudson Valley is no small feat – but as you’ve seen, the results can be spectacular. With the right approach, you can preserve the soul of your old home while making it comfortable and safe for modern living. From that first shaky inspection in a dusty attic to the final brushstroke on a restored window sash, restoring an older home is a journey of passion and perseverance.
If you’re feeling inspired (and perhaps a bit daunted) by the process, remember that you don’t have to go it alone. Our team at Chiusano Design Build has deep experience in historic restorations and renovations throughout the Hudson Valley. We understand the local building codes, the historic commission approvals, and most importantly, the craftsmanship required to bring an old treasure back to life.
Whether you’re just starting to evaluate a fixer-upper or you’re ready to renovate that family homestead that’s been around for a century, we’re here to help guide you every step of the way – from planning and permits to the final finishing touches.
Ready to preserve some history? Contact us for a Home Restoration Consultation. We’d love to learn about your project, share our expertise, and turn your vision into reality. Together, let’s ensure your historic Hudson Valley home’s next chapter is its best one yet.
(Internal link: Learn more about our Home Restoration Services and see examples of local historic projects we’ve proudly completed.)
Older Home Restoration FAQs
Q1: Do I need a permit to restore a historic home in Hudson Valley?
A: Yes, in almost all cases you will need various permits for restoration work – and if the home is in a historic district or designated as a landmark, you’ll also need approval from preservation authorities for exterior changes. Structurally, any significant alterations (removing walls, additions, etc.), system upgrades (new electrical wiring, new plumbing lines), or changes that affect safety (like adding an egress window) require a building permit.
Q2: Can I modernize the plumbing and electrical without damaging the original walls and trim?
A: It’s definitely possible to upgrade these systems with minimal damage – but it requires skill and planning. Electricians and plumbers who work on historic homes use techniques like “fishing” wires through existing wall cavities, or running new pipes through basements and crawlspaces, to avoid cutting into finished walls. Sometimes they may remove a few floorboards (and then replace them) to run wires or pipes underneath.
Q3: How long does a full historic home restoration take?
A: The timeline can vary widely depending on the scope of work, the size and condition of the house, and even how strict the historic review process is. However, you should anticipate that restoring an older home is a significant time investment – often many months to a couple of years for a full top-to-bottom restoration. For example, a modest 2,000 sq. ft. Victorian that needs structural fixes, new systems, and cosmetic restoration throughout might take 12-18 months of active work.
Q4: What materials should I use to match the home’s original features?
A: The general rule is to use like-for-like materials whenever feasible to maintain the home’s historic integrity. This means if your home originally had wood clapboard siding, repair or replace with wood clapboard rather than a synthetic. If the window trim was plaster or wood, keep using plaster or wood for patches – not modern plastic trims. Matching materials extends to other things like mortar (use lime-based mortar on old brick so you don’t damage it with overly hard cement), or using true slate if you’re replacing part of a slate roof. In New York and nationally, preservation standards emphasize replacement in-kind – i.e., same material, same design.
Q5: Will restoring my historic home increase its value?
A: In many cases, yes – a well-executed restoration can boost both the market value and appeal of an older home, sometimes significantly. Historic homes often have a higher baseline value due to their character and possibly desirable locations (like quaint village centers or scenic areas of the Hudson Valley). When you restore and update the home, you’re essentially unlocking that value for buyers who might love old houses but don’t want to take on major repairs.