How to Cut Tile the Right Way: Tools, Techniques, and Pro Tips for a Clean Finish
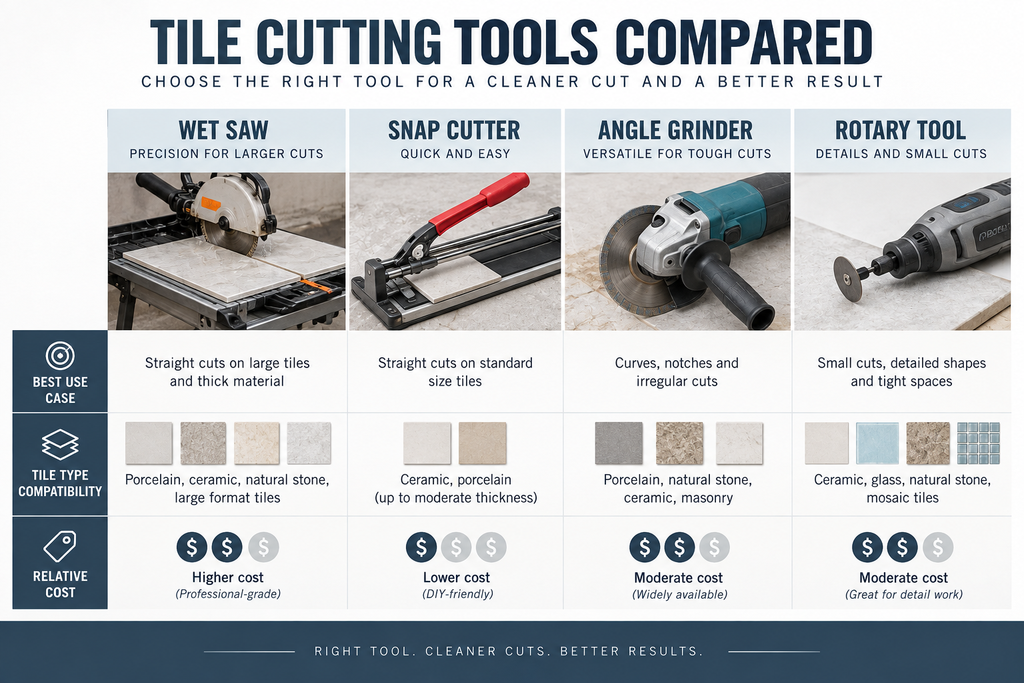
. The limitation is that it can’t handle curves, notches, or harder materials like porcelain without significant risk of cracking the tile unpredictably.
Angle Grinder
Fitted with a diamond blade, an angle grinder is your go-to for irregular cuts: L-shapes, notches, and cuts around plumbing penetrations. It’s loud, generates dust, and takes practice to use accurately, but it gives you freedom of movement that no other tool can match. Always use a dry-cut diamond blade rated for your tile type.
Rotary Tool (Dremel-Style)
For tight curved cuts around outlet boxes and detailed contour work, a rotary tool with a tile-cutting bit gives you precision in small spaces. It’s slower than an angle grinder and not suited for long cuts, but for intricate shapes it’s hard to beat.
How to Make a Straight Cut with a Wet Saw
The wet saw is where most tile cutting happens on a serious project, so understanding it well is worth your time. Start by measuring your tile and marking the cut line clearly with a pencil or tile marker. Set the fence guide on the saw table to your desired cut width. Make sure the water reservoir is filled and the blade is spinning before you feed the tile.
Push the tile slowly and steadily into the blade. Rushing creates heat, pressure, and chips. Let the blade do the work. For cuts narrower than about half an inch, use a support piece of scrap tile on the off-cut side to keep the tile stable as it passes through. Once the cut is complete, smooth the edge with a rubbing stone or fine diamond pad if it will be visible.
Blade quality has a measurable impact on cut precision and tile waste. Premium diamond blades with a continuous rim are rated for significantly longer use than segmented blades and produce notably cleaner edges on porcelain and glazed ceramic. Professional installers typically replace blades every 200 to 300 linear feet of cut on hard materials to maintain edge quality.
How Do You Cut Tile Without Chipping the Surface?
Chipping is the most common complaint among DIY tile cutters, and it almost always comes down to one of three causes: a dull blade, too much cutting speed, or insufficient support for the tile as it’s being cut. Fixing any one of these dramatically improves your results. Fixing all three makes chipping a rare exception instead of a consistent problem.
For glazed ceramic, apply a strip of painter’s tape over your cut line before scoring. The tape acts as a buffer that reduces surface fracturing as the blade passes through the glaze. For porcelain, there’s less you can do to compensate for a dull blade, so blade quality genuinely matters. Score lines should be made in a single confident pass rather than multiple hesitant strokes, which causes the scoring wheel to skip and create micro-cracks that propagate unpredictably when you snap the tile.
If you’re using a wet saw and still getting chips on the top surface, try flipping the tile face-down for the cut. The blade enters from the back face, so any chipping occurs on the underside where it won’t be visible once the tile is installed.
Porcelain vs. Ceramic: Does the Material Change Everything?
Porcelain tile is fired at higher temperatures than standard ceramic, making it denser, harder, and more water-resistant. It typically has a Mohs hardness rating of 6 to 7, compared to ceramic’s 4 to 5. That density is what makes porcelain so durable underfoot, but it also means it requires more powerful, sharper cutting tools and slower feed rates to achieve clean results.
Ceramic tile is more forgiving. A quality snap cutter handles most straight ceramic cuts without issue, and a standard diamond blade on a wet saw cuts through it quickly. Porcelain demands a continuous-rim diamond blade and a wet saw with adequate motor power. Attempting to snap-cut porcelain with a manual cutter often results in irregular breaks or complete cracking of the tile body, not just the glaze.
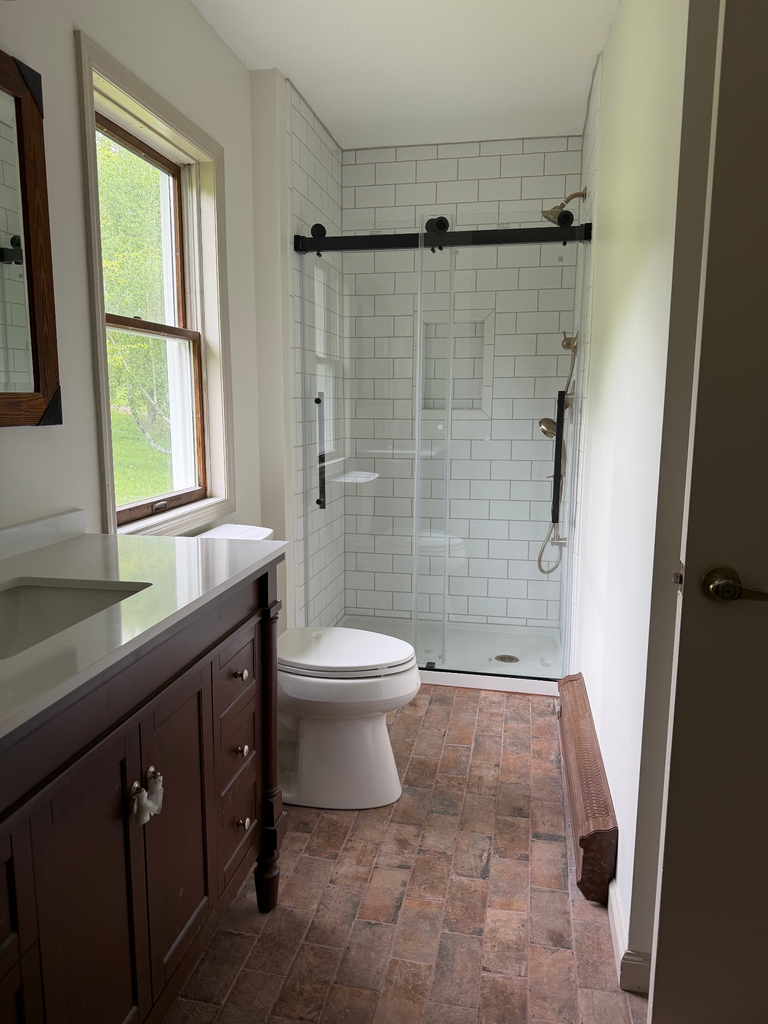
Natural stone like marble, travertine, and slate falls somewhere between the two in terms of cutting behavior, but adds the variable of natural veining and cleavage lines that can cause unexpected breaks. For stone tile, a wet saw with a fine-grit blade and very slow feed speed is the safest approach. Professionals working on tile installations, like those at Professional Tile Work Services from Chiusano Design Build, select blades and feed speeds specifically matched to the material at hand rather than using a one-size approach.
How Do You Handle Cuts Around Corners, Outlets, and Pipes?
Straight cuts are only part of the story in most real-world installations. Outlets, pipes, corners, and architectural details all require cuts that deviate from a simple line, and this is where many DIY projects stall or where the most visible mistakes happen.
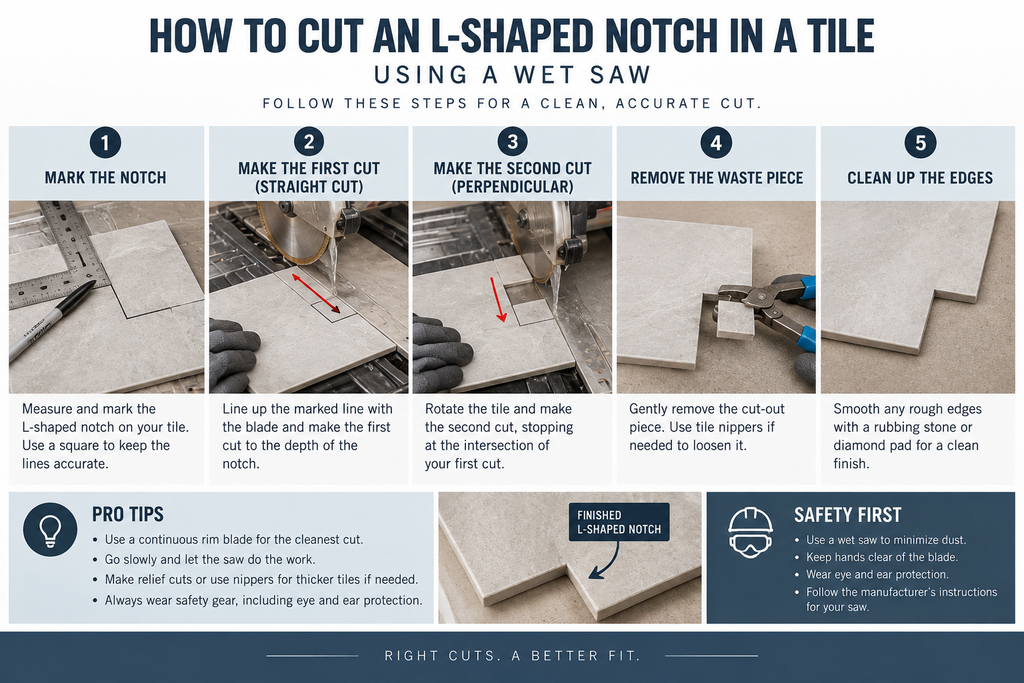
For an L-shaped notch cut around a door casing or cabinet, use your wet saw to make two intersecting straight cuts that meet at the corner of the L. You can’t complete this cut in a single pass, so you’ll run the blade to the corner from each direction and let the offcut piece fall away. For inside corner cuts where the saw can’t reach, finish with a hand tile saw or angle grinder.
Outlet box cutouts are best handled with a rotary tool or a specialized hole saw attachment. Trace the outlet box outline onto the tile face using a grease pencil or marker, then cut just inside the line. The outlet cover plate will hide any slight imperfection at the edge, so you have a small margin for error. Pipe penetrations follow the same principle: use a diamond-tipped hole saw matched to the pipe diameter, drill at low speed with water cooling, and aim for a hole slightly larger than the pipe so the escutcheon plate covers the edge cleanly.
Drilling through porcelain tile without water cooling can cause the diamond abrasive coating on hole saws to overheat and delaminate within seconds, effectively destroying a bit that may cost $20 to $60 to replace. Continuous water application during drilling extends bit life significantly and reduces the risk of thermal cracking in the tile itself.
Once you’ve made your cuts, the installation work continues with how to grout tile correctly so your joints are sealed and consistent. And if any tile gets chipped or cracked during the process, understanding how to fix chipped tile can save you from a full replacement.
Frequently Asked Questions
What is the best tool for cutting tile?
For most tile projects, a wet saw with a diamond blade is the best all-around tool. It handles straight cuts, diagonal cuts, and gradual curves on virtually any tile material including ceramic, porcelain, and natural stone. If you’re only making straight cuts on ceramic tile and working with a tight budget, a quality manual snap cutter is a practical and effective alternative.
How do you cut tile without chipping it?
Use a sharp diamond blade, maintain a slow and steady feed speed, and make sure the tile is fully supported on both sides of the cut. Applying painter’s tape over the cut line helps protect the glaze on ceramic tiles. For porcelain, cutting face-down on a wet saw directs any surface chipping to the back of the tile where it won’t be visible after installation.
Can you cut tile without a wet saw?
Yes, for certain tile types and cut styles. A manual snap cutter works well for straight cuts on ceramic tile. An angle grinder with a dry-cut diamond blade handles notches and irregular shapes. A rotary tool manages small curved cuts. The wet saw simply produces the most consistent, cleanest results across the widest range of materials and cut types, which is why it’s the professional standard.
How do you cut tile around corners and outlets?
L-shaped corner cuts are made using two intersecting straight passes on a wet saw, letting the offcut piece fall free. Outlet cutouts are best made with a rotary tool or oscillating tool, tracing the box outline directly onto the tile face. Pipe holes require a diamond-tipped hole saw matched to the pipe diameter, drilled at low speed with continuous water cooling to prevent overheating.
What’s the best way to cut porcelain vs. ceramic tile?
Porcelain requires a continuous-rim diamond blade on a wet saw with a slower feed speed due to its density and hardness. Ceramic tile is softer and more forgiving, making it compatible with both manual snap cutters and wet saws. Attempting to snap-cut porcelain with a manual cutter typically results in irregular or complete fractures rather than a clean break along the score line.
Ready to Stop Worrying About the Cuts? Let’s Talk.
Cutting tile correctly takes practice, the right tools, and a clear understanding of the material you’re working with. When you get it right, the result is a finished installation that looks precise, intentional, and built to last. When the cuts go wrong, recovering from the damage in time, material, and money is genuinely painful.
If your project involves complex cuts, expensive tile, or a surface where precision is non-negotiable, working with experienced professionals removes all of that risk. Chiusano Design Build has been helping Hudson Valley homeowners achieve flawless tile installations across kitchens, bathrooms, mudrooms, and beyond. From the first measurement to the final grout joint, every detail is handled with care.
Call 845-201-9450 to talk through your project, or visit our Contact Chiusano Design Build page to request a consultation. Let’s make sure your tile installation comes out exactly the way you envisioned it.