How to Tile a Shower in Hudson Valley: A Complete Step-by-Step Guide
Tiling a shower correctly requires proper waterproofing, substrate preparation, layout planning, and precise tile installation before grouting and sealing. This guide walks Hudson Valley homeowners through every stage of the process, covering materials, tools, common mistakes, and when it makes sense to call a professional instead of going the DIY route.
A leaking shower doesn’t announce itself with a trumpet. It seeps quietly behind walls, feeds mold growth inside your framing, and turns what could have been a beautiful bathroom into a costly repair project. Most shower tile failures don’t come from bad tile or bad grout. They come from skipping steps or rushing the process. Whether you’re planning a full renovation or retiling an aging shower, understanding how to tile a shower properly from the ground up is the difference between a 20-year installation and one that fails in three.
Key Takeaways
- Waterproofing the substrate is non-negotiable before any tile goes up.
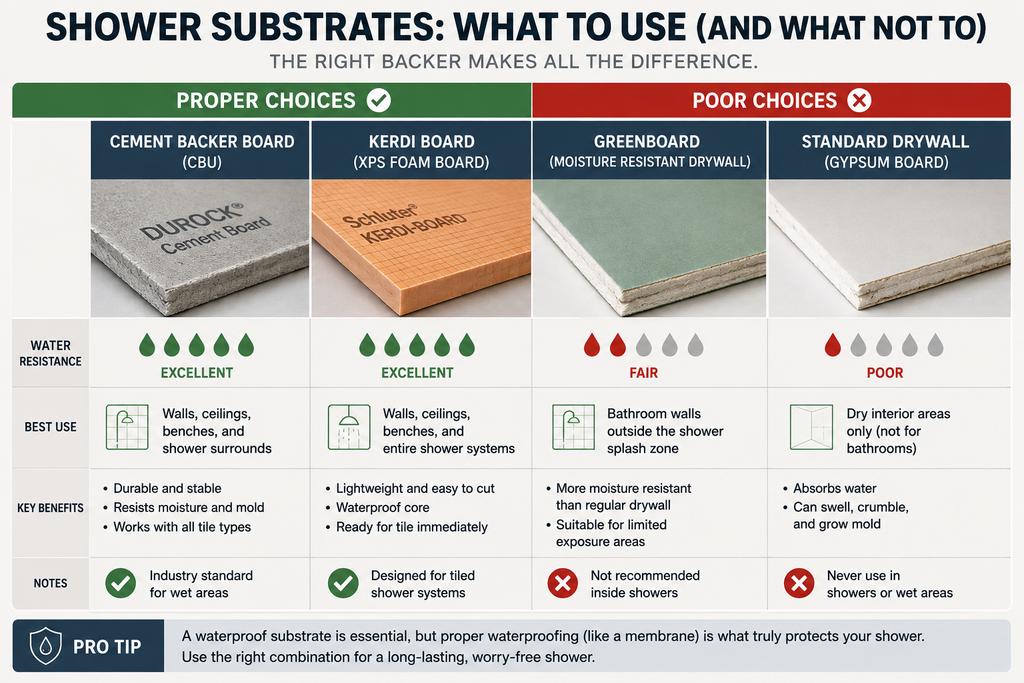
- Cement board or a waterproof membrane system must be used in wet areas, never standard drywall.
- Layout planning before you set a single tile prevents costly mistakes mid-installation.
- Tile needs adequate cure time before grouting, typically 24 hours minimum.
- Grout sealing after installation dramatically extends the life of your shower.
- Complex layouts, large-format tile, or existing water damage are strong signals to hire a professional.
Why So Many Shower Tile Jobs Go Wrong
Walk through any home improvement forum and you’ll find the same story repeated dozens of times: homeowner tiles a shower, grout starts cracking within a year, water gets behind the wall, and suddenly a $500 weekend project turns into a $5,000 mold remediation. The root cause is almost always one of three things: skipping proper waterproofing, using the wrong substrate material, or rushing the mortar cure time before grouting.
Water damage from improperly waterproofed showers is one of the leading causes of structural damage in residential bathrooms, with repair costs commonly ranging from $1,000 to over $10,000 depending on how long moisture has been present and how far it has traveled into framing and subfloor materials.
In older Hudson Valley homes especially, the temptation is to tile right over existing drywall or old greenboard. Both are inadequate for a wet shower environment. Greenboard resists incidental splash but is not a waterproof barrier. Standard drywall behind tile in a shower is a ticking clock. Getting this part right before any tile goes up is the single most important thing you can do.
What You’ll Need Before You Start
Gathering the right materials upfront saves you three trips to the hardware store mid-project. For a standard shower, you’ll need cement board or a waterproof tile backer (such as Schluter Kerdi board or similar), thinset mortar rated for wet areas, waterproofing membrane or liquid waterproofing compound, tile spacers, a notched trowel, grout float, level, tile saw or wet saw, grout, and grout sealer.
For tile selection, ceramic and porcelain are the most practical choices for shower walls because of their low water absorption rate. Natural stone like marble or travertine looks stunning but requires more maintenance and a sealer applied regularly to prevent staining and moisture intrusion. Mosaic tiles work well on floors because smaller tiles conform better to the slope toward the drain.
Preparing the Substrate the Right Way
Before any tile touches the wall, your substrate needs to be solid, flat, and waterproofed. Start by removing any existing tile, drywall, or wall material down to the studs. Inspect the framing for rot or mold. If you find any in a Hudson Valley home that’s had a previous leak, address that before proceeding. Sistering new studs next to damaged ones or replacing sections of subfloor is tedious work, but skipping it means tiling over a compromised structure.
Install cement board by screwing it into studs with appropriate cement board screws, spacing them every 8 inches along the edges and 16 inches in the field. Tape all seams with alkaline-resistant mesh tape and thinset. Once the board is up, apply your waterproofing layer. Liquid-applied membranes like Redgard are popular for DIYers because they’re forgiving and easy to apply with a roller. Pay particular attention to corners and any seams, as these are the most vulnerable areas. If you’re using a sheet membrane system, embed it in thinset and smooth out all air bubbles carefully.
Planning Your Layout Before Cutting a Single Tile
Layout is where many first-time tilers make a mistake that haunts them for the rest of the job. Dry-fitting your tiles before you apply any mortar is not optional. Start by finding the center of your back wall and working outward. This ensures that any cut tiles at the edges are equal on both sides, which looks intentional rather than rushed. If a cut tile at the edge would end up less than half a tile wide, shift your layout by half a tile so the cuts are wider and more visually balanced.
Decide whether you want your grout lines stacked (grid pattern) or offset (brick pattern). A stacked pattern is cleaner and modern-looking but requires very precise alignment. An offset or running bond pattern is more forgiving of minor inconsistencies, which is one reason it’s so popular in showers. Mark your layout lines with a level and pencil before you start setting tile. Those lines are your reference throughout the job.
Setting the Tile: Technique Matters More Than Speed
Mix your thinset mortar to a smooth, peanut butter consistency. Too dry and it won’t bond properly. Too wet and it will sag on vertical surfaces. Use a notched trowel sized to match your tile, typically a 3/16-inch V-notch for small tiles and a 1/4-inch square-notch for tiles 12 inches or larger. Spread thinset on the wall and back-butter each tile as well, especially for larger format tiles where full contact matters more. Press the tile firmly and give it a slight twist to collapse the trowel ridges and ensure full coverage beneath the tile.
Industry standards from the Tile Council of North America recommend a minimum of 80% mortar coverage under wall tiles in dry areas and 95% coverage in wet areas like showers, with full coverage at all tile edges to prevent water from migrating underneath the tile surface.
Work in sections of about four square feet at a time so the thinset doesn’t skin over before you set the tile. Use tile spacers to maintain consistent grout joint width. Check your work frequently with a level, both horizontally and vertically. It only takes one row slightly out of plumb for the error to multiply visibly by the time you reach the top of the wall.
When you need to cut tiles for edges, outlets, or around fixtures, a wet saw produces the cleanest cuts and reduces the chance of cracking the tile. A manual snap cutter works for straight cuts on ceramic tile but isn’t suitable for porcelain or natural stone, which require a wet saw.
Grouting, Sealing, and the Finishing Details
Once all the tile is set, wait at least 24 hours before grouting, and longer in humid conditions. Remove tile spacers carefully, clean any dried thinset from the tile faces, and inspect every joint to make sure it’s clear of debris. Choose your grout type based on your joint width: unsanded grout for joints under 1/8 inch, sanded grout for wider joints.
Epoxy grout, while more expensive and harder to work with than cement-based grout, is significantly more resistant to staining and moisture absorption, making it a preferred choice for shower floors and horizontal surfaces where standing water increases the risk of discoloration over time.
Mix grout to a firm consistency and work it into joints using a rubber float held at a 45-degree angle to the tile surface. Apply in a diagonal motion across the joints to pack them fully. After about 15 to 20 minutes, once a slight haze forms, wipe the surface down with a damp sponge in a circular motion. Work in small sections and rinse your sponge frequently. After the grout has fully cured, typically 72 hours, apply a penetrating grout sealer to all joints. This step is skipped far too often and is a major reason grout darkens and deteriorates prematurely.
Don’t forget to caulk at all inside corners and at the transition between the shower wall and floor. These are expansion joints, and using caulk instead of grout there allows for the natural movement of the building without cracking. In older Hudson Valley homes that settle seasonally, this is particularly important. If you’re ever dealing with failure or how to fix chipped tile situations after installation, catching the problem early makes repair far more manageable than letting it escalate.
When DIY Makes Sense and When It Doesn’t
A straightforward shower with standard-size ceramic tile and no unusual layout challenges is a project a skilled DIYer with patience can handle successfully. But several situations shift the math considerably. If your existing shower has visible water damage, soft spots in the wall, or mold, that needs professional remediation before any tile work begins. Large-format tiles (24×24 or larger) are notoriously unforgiving and require a perfectly flat substrate and skilled application technique to avoid lippage, which is the visible unevenness between adjacent tiles.
Professional shower tile installation in the Northeast typically ranges from $15 to $40 per square foot for labor, depending on tile size, pattern complexity, substrate conditions, and regional labor rates, with full shower renovations commonly running between $3,000 and $12,000 or more for complete gut-and-retile projects.
For homeowners across the Hudson Valley considering professional tile installation services, working with an experienced local contractor means getting the substrate assessment, waterproofing, and installation done correctly the first time, with a warranty on the work. The math often favors professional installation when you factor in the cost of tools, materials, and the real risk of doing something wrong that requires tearing the whole thing out later.
Frequently Asked Questions
How do you tile a shower step by step?
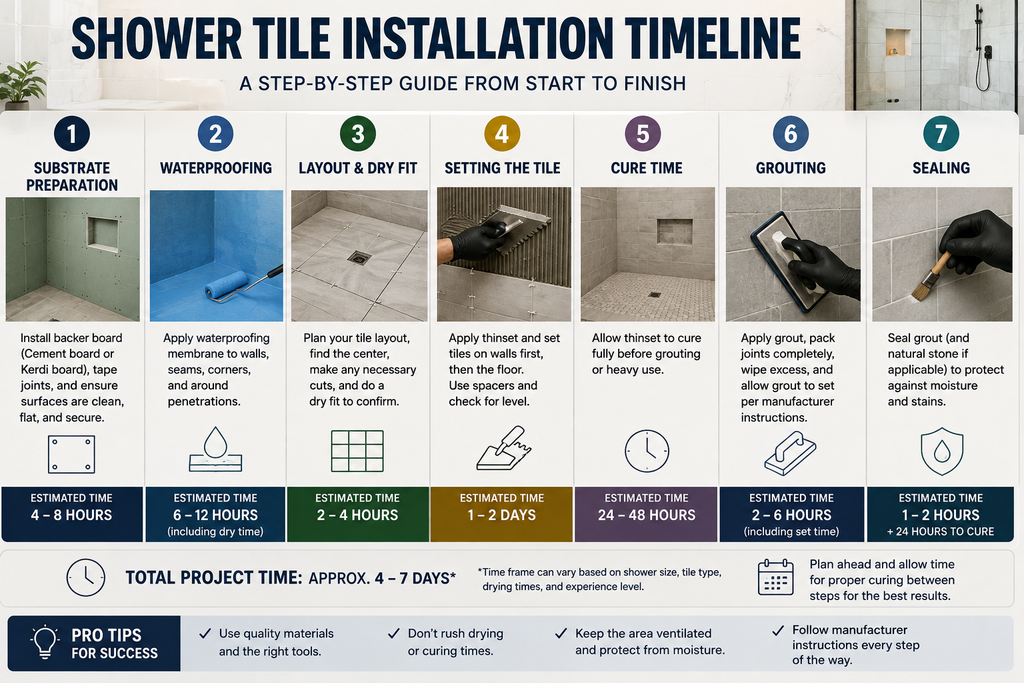
Start by removing old materials and inspecting the framing, then install a waterproof substrate like cement board. Apply a waterproofing membrane, plan your tile layout by dry-fitting first, and then set tile using thinset mortar with appropriate trowel coverage. After a 24-hour cure, grout the joints, clean the surface, and finish with grout sealer and caulk at all corners and transitions.
What should you put behind the shower tile?
Cement boards (such as HardieBacker or Durock) or a dedicated waterproof tile backer like Schluter Kerdi board are the appropriate materials behind shower tile. Standard drywall and greenboard are not waterproof and will break down with repeated moisture exposure. A liquid-applied or sheet waterproofing membrane should be added on top of the substrate before tile is set.
Do you need to waterproof a shower before tiling?
Yes, waterproofing is mandatory, not optional. Even cement board is not inherently waterproof; it resists moisture but water can still pass through it over time. A waterproofing membrane applied over the substrate creates a continuous barrier that directs water away from the framing and prevents the structural damage and mold growth that result from long-term moisture infiltration.
Should you tile the shower walls or floor first?
Tile the walls first, then the floor. Setting wall tiles before floor tiles allows you to maintain cleaner grout lines and makes it easier to cut the bottom row of wall tiles to sit just above the floor tile surface. It also prevents accidentally damaging floor tiles while working on the walls. Leave a small gap at the bottom of the wall tiles that will be covered by the floor tile or finished with caulk.
How long should the shower tile set before grouting?
Wait a minimum of 24 hours after setting tile before grouting, and allow longer if the space is humid or if you used a polymer-modified thinset that benefits from extended cure time. Grouting too early can disturb the tile bond before the mortar has reached its full strength. In cool or damp conditions typical of Hudson Valley winters, 36 to 48 hours is a safer target.
Ready to Get Your Shower Done Right?
Learning how to tile a shower is genuinely achievable for a motivated homeowner with the right preparation and patience. But the margin for error is thin, and the consequences of shortcuts show up months or years later when water has already done its damage behind the walls. Whether you’re planning to tackle this yourself or want an expert team to handle every stage from substrate assessment to final seal, knowing the process puts you in a much better position to get the result you want.
If you’re in the Hudson Valley and want the job done correctly the first time, the team at Chiusano Design Build brings the expertise, materials knowledge, and local experience to deliver shower tile installations that hold up beautifully for years. Contact Chiusano Design Build today or call 845-201-9450 to schedule a consultation. There’s no pressure, just a conversation about your project and what it would take to get it right.